Professional Garden Kerbing Machine for Perfect Landscape Edging
Tired of time-consuming, labor-intensive traditional garden edging methods? Discover the MecBase ProGarden 2000 – the industry’s most advanced electric garden kerbing machine that delivers professional-grade concrete curbing with unmatched efficiency and design flexibility. Designed for landscape contractors, municipal projects, and serious DIY enthusiasts, our machine turns complex edging projects into simple, profitable operations.
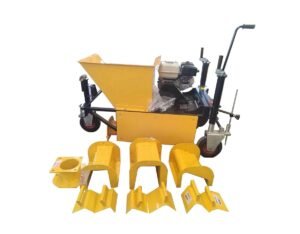
MecBase Garden Kerbing Machine Product Specifications
| Category | Parameter | Specification | Category | Parameter | Specification |
|---|---|---|---|---|---|
| Basic Info | Product Name | Concrete Curb Machine / Kerbing Machine | Core Specs | Core Component | Engine |
| Brand | MecBase | Engine Model | GX160 | ||
| Place of Origin | China | Power | 5.5 HP | ||
| Warranty | 1 Year | Weight | 160 kg | ||
| Performance | Working Type | Walk-behind | Advantages & Service | Unique Selling Point | Easy Maintenance |
| Working Speed | 1-2 m/min | Video Outgoing-Inspection | Provided | ||
| Mold | Customized | Machinery Test Report | Provided | ||
| Application Material | Concrete |
Why Choose MecBase ProGarden 2000?
🚀 UNBEATABLE EFFICIENCY
- 10X Faster Installation: Complete 50-150 linear meters per day compared to 10-15 meters with manual methods
- Single-Operator Design: One person can handle the entire process from mixing to finished curb
- Continuous Operation: Walk-behind design with 1-4 m/min adjustable working speed
- Reduced Labor Costs: Cut crew requirements from 3 people to just 1 operator
🎨 ULTIMATE DESIGN FLEXIBILITY
- True Radius Curving System: Create perfect curves with as little as 0.5-meter radius
- 12+ Mold Profiles Included: Choose from classic bullnose, modern square, stone-textured, and decorative patterns
- Fully Customizable: We create custom molds for unique project requirements
- Adjustable Dimensions: Curb width 80-300mm, height 100-200mm – all adjustable on-site
⚡ CLEAN & QUIET ELECTRIC OPERATION
- Zero Emissions: Environmentally friendly operation perfect for residential areas
- Low Noise (<65dB): Work early mornings or evenings without disturbing neighborhoods
- 3.5kW Electric Motor: Powerful yet economical operation costs approximately $0.50/hour
- Dual Voltage Option: 110V for North America or 220V for international markets
🏆 PROFESSIONAL-GRADE CONSTRUCTION
- Commercial-Grade Components: Industrial bearings, hardened steel auger, polyurethane molds with 5,000+ meter lifespan
- Integrated Vibration System: Ensures maximum concrete density and compressive strength (C25+)
- Optional Laser Guidance: Achieve ±2mm precision over 10-meter spans
- All-Weather Design: Stainless steel critical components resist corrosion
How to use a landscape curbing machine?
Using a landscape curbing machine involves preparation, operation, and finishing. Here is a step-by-step guide to the key phases.
Phase 1: Preparation & Setup (Most Critical)
Proper setup directly determines the final result.
- Plan & Mark: Clearly outline the desired curb path using string lines, spray paint, or a garden hose. This is your guide.
- Prepare the Base: Excavate a shallow, level trench (about 10-15 cm deep and slightly wider than the curb) along the marked line. Fill it with a compactable base material like road base or gravel, and compact it firmly to create a stable, unyielding foundation.
- Mix the Concrete: Prepare a semi-dry, zero-slump concrete mix. The consistency is crucial—it should hold together when squeezed but not be soupy. Wet mixes will fail. Add color hardener or integral color at this stage if desired.
- Position the Machine: Place the curbing machine at the starting point, aligning its guide wheel or edge with your string line. Ensure it is stable and level.
Phase 2: Operation & Paving
- Load & Start: Fill the machine’s hopper with the mixed concrete. Start the engine. The auger will move the mix toward the mold.
- Begin Paving: As concrete is extruded from the mold, slowly walk the machine forward along your guide line. The machine’s weight and the extrusion process will form the curb. Maintain a steady, slow pace—rushing causes inconsistencies.
- Continuous Feeding: Keep feeding concrete into the hopper to ensure a continuous flow without gaps. Have helpers for mixing and feeding for longer runs.
Phase 3: Finishing & Curing
- Initial Shaping & Joints: Immediately after extrusion, use hand tools to smooth the top and sides, add texture, and cut control joints every 0.6-1.2 meters to control cracking.
- Edge Sealing & Cleanup: Use an edging tool to create a clean seam between the new curb and the ground. Clean any spilled concrete from surrounding surfaces before it sets.
- Curing: This is essential for strength. Keep the curb moist for at least 3-7 days. Cover it with plastic sheeting or burlap and mist it regularly. Avoid any stress or foot traffic on it for a minimum of 48 hours.
⚠️ Key Pro Tips & Safety
- Practice First: Always do a test run on a hidden area or scrap lumber to get a feel for the machine’s speed and the correct concrete mix.
- Safety Gear: Wear safety glasses, gloves, sturdy boots, and hearing protection.
- Mix Consistency is King: The #1 cause of failure is concrete that is too wet. It will slump and lose shape.
- Weather: Avoid curbing in extreme heat, direct sun (which dries concrete too fast), or when rain is expected.